Hi there, I’m AWS EC2 Scheduler: Central.
My name is little wired! Isn’t it? Then you can call me by a name of your choice.
I’m serverless, so don’t worry about where I run. Technically I run in one of your AWS regions and look after all of your EC2 instances in the region.
Why? Because I want to help you save cost by shutting-down the instances when they are not in use. Also, I will start them up just before you need them.
All these will be done automatically. You just say when you want to do that, and I will take care of the rest.
You can also read this article on Medium.
Family Background
I belong to a family who takes care of scheduling of EC2 instances. I have a sibling AWS EC2 Scheduler: On-demand who helps you easily create and manage individual schedulers for different groups of EC2 instances based on their schedules.
But I do things differently!
I’m the ONE, and only ONE sitting in your account and looking after all of your EC2 instances across regions irrespective of their schedules.
Historically, we (me and my sibling) use Amazon CloudWatch Events and AWS Lambda functions.

How I Work
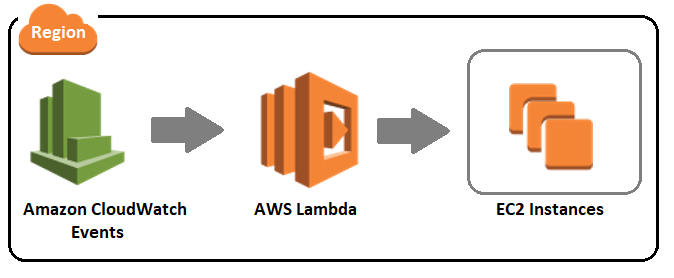
In CloudWatch Events, I create a Rule that triggers at a regular interval. This rule can invoke AWS Lambda function as target.

So, I deploy one Lambda function which searches the EC2 instances and start or stop those instances based on their respective configuration settings.

Let’s Implement Me
All the source code and configuration details, discussed here, are available at the Github repository. You can use the CloudFormation template for one-click-deployment of all the resources.
Note
STEP 1: Create the Lambda function for starting and stopping EC2 instances
I’ve a Lambda function written on Python. You can use any other supported programming languages.
I’ve created a Lambda function start-stop-ec2-instances.
STEP 2: Associate required IAM Role to the Lambda function
The Lambda function requires permissions to generate CloudWatch Logs and perform actions on EC2 instances. We need IAM Role with appropriate Permissions for the Lambda function.
I’ve created one IAM Lambda Role — lambda-ec2-start-stop-instances with AWSLambdaBasicExecutionRole policy attached to it and associated the role to the Lambda function.
I’ve also created two IAM Inline Policies— autoscaling-describe-update-group and ec2-start-stop-instances and attached them to the IAM Role.
STEP 3: Optional Testing
At this point, we have successfully created a Lambda function for starting and stopping EC2 instances. We can perform some testing to make sure it works.
To do that, first add appropriate tags to your instances. There are three tag keys that you can use:
a) auto:Schedule — This tag value can be set to ON or OFF representing whether automatic start/stop of the instance is enabled or disabled respectively. You might want some instances to be running always and don’t want to disturb them by the auto-scheduler. In such cases, you can set this tag value to OFF.
Note: All the tag keys and their values are case insensitive. The auto:Schedule tag supports any of the values: ON/OFF, YES/NO, TRUE/FALSE.
b) auto:StartTime — The UTC time in 24 hr. HH:MM format. This represents when to start the instance.
c) auto:StopTime — The UTC time in 24 hr. HH:MM format. This represents when to stop the instance.
After you are done with tagging your instances, invoke the Lambda function with parameters as mentioned in start-stop-ec2-instances.json.
Your EC2 instances will be started or stopped based on the current time and the tag values you set.
Note: I will discuss about the parameter configurations in details in the upcoming section.
STEP 4: Create CloudWatch Events Rule with a fixed interval time
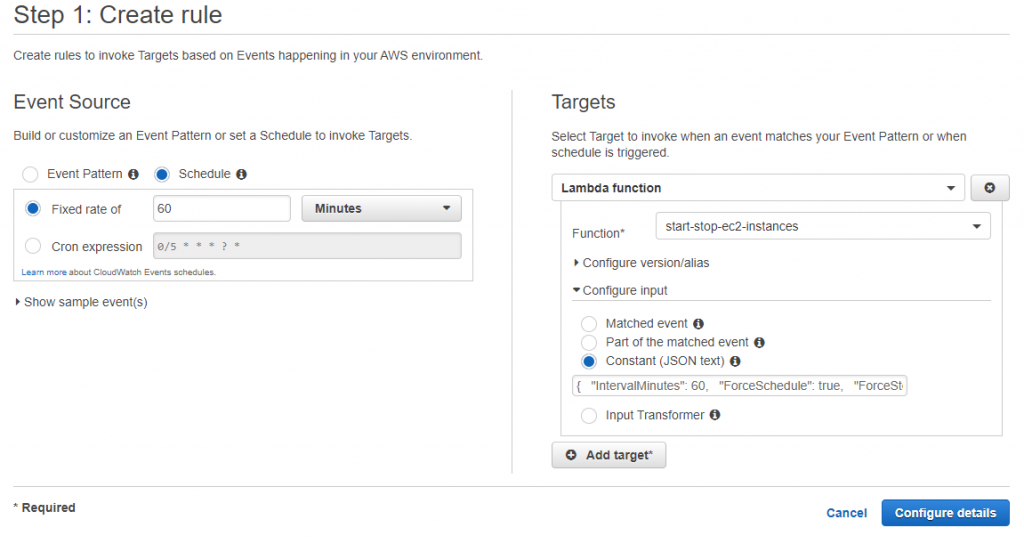
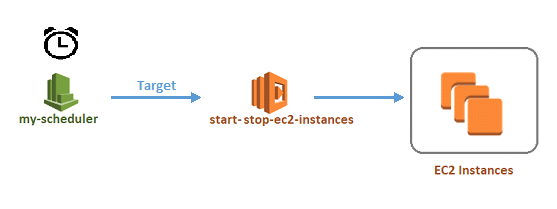
I’ve a CloudWatch Events Rule (as shown below) that is triggered at a fixed interval. Every time the rule is triggered, it invokes the start-stop-ec2-instances Lambda function.

As shown above, create a rule say my-scheduler that will be triggered every 60 minutes (for example). Make sure you provide the same interval in the input section of the Lambda function. The rule interval is 60 minutes here, so the IntervalMinutes will also be set to 60.
STEP 5: Associate required permissions to the Lambda functions
At the end of STEP 3, we tested that the back-end Lambda functions are working. However, that is only when the identity invoking the Lambda functions has required permission to invoke the functions.
In our solution, the back-end Lambda functions will be invoked by CloudWatch Events Rules. So, we need to associate right permission policies to the back-end functions so that CloudWatch Events Rules can invoke those functions.
Execute the command add-permission-to-start-stop-ec2-instances.cmd to add required permission to start-stop-ec2-instances function.
STEP 6: Perform Final Testing
Now, we’ve completed the solution implementation and it’s time to perform the final testing.
Tag your Instances: Similar to how we tagged instances in Step 3, pick some already stopped instances and set the StartTime to a future time such a way that it will fall within next 2 interval times. On the other hand, pick some already running instances and set the StopTime to a time so that it will fall within next interval.
Wait for the Trigger: Wait for CloudWatch Events to trigger the rule and you will see that the instances are started and stopped accordingly.
Advanced Parameter Configurations
There are lot of things that you can do with the available parameter configurations. You have already seen the parameters in STEP 3. Let’s have a closer look into those now and I will explain how you can tweak them to get desired result.
a) IntervalMinutes: I’ve explained in STEP 4 that you can define how frequently you would want to run your scheduler. The unit is in minutes.
b) ForceSchedule: Imagine you have a fleet of EC2 instances in your environment and you have asked your users to tag their instances to leverage the benefit of auto-scheduler.
As you have seen in STEP 3 that auto:Scheudule tag defines whether to automatically start/stop a particular instance or not. However, you have observed that there are instances that are either not tagged or tagged incorrectly.
If you set the ForceSchedule parameter to false, your auto-scheduler will simply ignore those instances. It will behave as if the instance’s auto:Schedule tag is set to OFF.
But if you set the ForceSchedule parameter to true, then the auto-scheduler will attempt to stop those instances which are not tagged properly for auto:Schedule.
So, this parameter lets you implement some sort of mandate in your environment to apply the auto:Schedule correctly.
Note: Attempting to stop does not mean that the instances will be stopped always. There are other considerations before actually stopping the instances which are explained below.
c) ForceStop: Now let’s imagine there are instances which are tagged for auto-scheduling (i.e. auto:Schedule is set to ON) however the user has not tagged the auto:Stop-Time-UTC properly or the provided the value is invalid.
Similar to the previous case, if you set the ForceStop parameter to false, the instances will be ignored from stopping. But if you set the ForceStop parameter to true, then the auto-scheduler will attempt to stopthose instances.
d) SmartStop: If an instance is part of an auto-scaling group then stopping an instance is not the solution. Because, if you stop an instance then the auto-scaling configuration will detect the health-check failure and launch new instance based on the configuration.
So, the instances belonging to an auto-scaling group have to be tagged for auto:Schedule set to OFF. This can be achieved by applying tags in the launch configuration/template.
Otherwise, the only option to stop such instances is to make changes to the auto-scaling configuration. We can set the auto-scaling group MinimumSize and DesiredCapasity to 0. This will result in terminating all the instances belonging to an auto-scaling group.
So, when the auto-scheduler attempts to stop an instance it checks whether the instance is belonging to an auto-scaling group or not. If it does not belong to an auto-scaling group, the auto-scheduler will go ahead and stop the instance.
However, if the instance is belonging to an auto-scaling group, then it will check the SmartStop parameter value. If it’s set to false, then the auto-scheduler will ignore the instance from stopping. But if the SmartStop parameter is set to true, then it will set the instance’s auto-scaling group’s MinSize and DesiredCapacity to 0. This will result in automatically terminating those instances by the auto-scaling group.
One-click Deployment
I’ve put all these inside a AWS CloudFormation template so that all the resources (AWS Lambda functions, IAM Roles, IAM Policies etc.) can be provisioned in a single click. This can save significant time & resources and might interest you if you are lazy 😜 !!!
Bottom Line
The Lambda function code couldn’t be inserted into the CloudFormation template as inline code because of it’s large size. So, you need to first create a deployment package which is a ZIP archive containing your function’s source code file. Then, upload the package into an S3 bucket in the same region and then refer that while creating the CloudFormation stack.
Do you have any thoughts? Feel free to share in the comments below.


![AWS Certified Solution Architect – Associate: Exam Guide [2019]](https://urbancodex.com/wp-content/uploads/aws-certified-solutions-architect-associate-certification-300x122.png)
![OCI Foundations 2020 Certified Associate: Exam Guide [2020]](https://urbancodex.com/wp-content/uploads/oci-foundations-2020-certified-associate-300x300.png)
![Google Cloud Certified – Associate Cloud Engineer: Exam Guide [2019]](https://urbancodex.com/wp-content/uploads/google-cloud-certified-associate-cloud-engineer-300x102.png)